Sunday, 21 February 2016

The Nausicaa Project: Blue Plumage

My Post this week is going to be on how I made miniature feathers for Kai. This was my main reference for the overall look and colour:


I considered some different methods of how I might make the feathers - silk fabric, tissue paper - in the end it made the most sense to use actual feathers, as you can't get closer than the real thing! The only issue was scale, as this puppet needed to be covered in 2cm long feathers, with stalks that were very thin. 

I experimented with cutting down the top of a regular sized feather and found that it looked like the perfect miniature:


So now I had to work out how many feathers I'd need to cover Kai, and order a bulk lot of the same type for consistency. I ordered 600 white goose feathers, with the intention of hand dyeing them blue myself. I considered buying them pre-dyed to save time, but for the right colour match and a natural variation I figured that mixing the colour myself was the best option.


I then spent 10 hours dyeing 600 feathers! I discovered two valuable things: one, the waxy surface of feathers don't like to take dye, so you have to give them a really good wash in soda ash first. Two, rit dye doesn't work very well, silk dye works much better. I guess that's because it's made for a natural material. I ended up using a combination of rit dye and silk dye in the vat, in two different shades of blue.


By changing the consistency of how long I dyed different batches of feathers for, and how concentrated the dye was (or varying the colour - I dipped some of them in a separate purple vat) I ended up with feathers in a myriad of blue and purple tones, just what I wanted!

I started by building up the tail, as I'd need larger feathers for this part. My aim was to get the 'fan' look, similar to Miyazaki's artwork:


I started at the base of the tail and built backwards, starting with smaller feathers and working my way out to the very large ones.


The feathers are glued to the nylon skin of the bird puppet with a dab of UHU glue.


I was able to build up a lovely fan shaped tail, similar to the artwork. My only thought is that it could be held higher, so I might revisit that at a later point and see if I can get the larger feathers around the edge to stick up more.


For the main feathers on the body, I'd need hundreds of teeny tiny feathers. I worked out that 2cm was a good looking standard size. One by one, I started cutting the large feathers down, production line style! Unfortunately half of each feather went to waste, because it gets to the point where the stalks are too thick and out of scale.


I started by layering these on the back, once again using a dab of UHU glue on the ends to secure them to the body. At this point I really began to appreciate the effect of the colour variation.


I used the most fluffy, downy feathers for Kai's chest, as they have a lovely fluffiness to them.


The build up process was surprisingly quick! Although repetitive, each new patch of skin covered was very satisfying.


I also used the downy feathers for the bottom of the legs, where they'd likely be smaller and fluffier.


I like how the feathers have an almost armour-like quality to them when they're layered up. The trickiest part was the top of the legs, as I had to get that curve looking natural.


The stalks on the feathers got a little thick here, as I was running low and having to use offcuts. I think they'll look just fine if I paint out the white stalks individually.


From the front, nearly finished and looking noble!


The head was the last section that needed covering, and required the most detail. I made the feathers smaller on the face, especially around the eye. As you can see at this point, he's got a silicone skin piece that sits around the eyeball. I sculpted this, made a plaster mould for it and cast it.


It got to the point where I had to make my own feathers by glueing two sides cut down from a large stalk back together again, because I'd totally ran out of feathers in the right scale. Can you tell the difference between the fake and real feathers in the photo?


Kai isn't 100% covered yet because I ran out of feathers, leaving half of his belly naked. I've ordered some more and will be dyeing them soon to get him finished and ready for prop decorations - his saddle, bridle, saddle bags etc.

Thanks for reading and following my project!

Sunday, 7 February 2016

The Nausicaa Project: A Prehistoric Beak Takes Shape

Hi there everyone! Time for another update on a rainy Sunday evening in Cardiff. In this post I'm going to talk about the process of making Kai the bird's beak, from sculpting through to mould making, casting and painting.

I had a few references for Kai's beak from the manga of Nausicaa, the film, a Bandai model kit and also Miyazaki's watercolour concept art. Most of them were similar to look at; a large smooth beak with a horned tip and flat nostril on the top. In one watercolour piece the beak was a bit more interesting - the surface had more shape and detail, which I quite liked. So I decided that my main inspiration for the beak would come from this image:


My plan was to sculpt the beak, based on my scale drawing, in two separate halves. However given that I was making it hollow and quite large, I needed something to support the final shape that I could sculpt on top of.


Here was the solution: I made a solid shape of the beak which was the length/width/shape of the hollow inside I wanted. I then covered this in cling film and built on top of it with a thin Milliput base. Milliput is very strong, so once this solidified I was able to dig out the clay, leaving me with a firm but hollow shape to sculpt on top of. Note that I left a reasonable gap around the eye socket. 


Here it is after the clay was removed, the perfect shape and size for building onto. Major credz to Nathan Flynn (Sculpt Double) for teaching me this technique!


I then sculpted the beak onto the Milliput base in medium plastilline clay.


I textured the surface slightly using the end of a bristly paint brush, to give the beak a nice surface for getting that weathered, nomadic animal look!


Once I was happy with how the top half of the beak was looking I made a mould box for it out of foam board glued together with hot glue. The pour spout (coming out of the base into the back of the skull) has a piece of brass rod going through it which was glued down to the base of the foam board, keeping the heavy sculpt stable and secure.


Here it is fully boxed up and ready to be poured!


Here's the resulting silicone mould, just after I poured the two part Fast Cast resin in. It's blue and pink because I ran out of silicone halfway through and the catalyst for the new batch was a different colour! 


The resulting beak cast! There were a few air bubbles and such that I needed to clean up, but nothing major.


The next stage was to sculpt the bottom half of the beak, which was very tricky because I had to make it fit nicely with the top half and also stay true to the design in the artwork.


I got there eventually and was happy with the final look. Here it is after also being moulded in silicone and cast in fast cast:


After some filling, sanding and a general clean up, the two pieces were ready to paint.


I spray painted them in a base coat of Tamiya 'Wooden Deck Tan'.


I used a combination of ground down chalk pastels and washes of brown acrylic paint to get the desired look. The head is attached to the neck through the skull, the aluminium wire glued to a piece of hollow brass rod I set inside the skull. The bottom half of the beak is attached to the top half in a similar way.


Skipping ahead to where I'm currently at with this puppet, the beak has really come into its own! I'm very happy with how it's looking. Thanks again for following this project, and check back next week for another update.

Sunday, 31 January 2016

The Nausicaa Project: Soft Sculpting the Face

Hi everyone! Big apologies that this post has come two weeks late - I've been awfully busy recently and haven't found time to update my blog!

 I'm going to continue from where my last post left off, which covered the process of building up Nausicaa's body in soft sculpture. I've made a lot of progress since - she has a face now and is ready to get her nylon skin!


Once I was relatively happy with the shape of her body, with only a few minor adjustments to make, I moved onto the face.


Lying her against my scale drawings was helpful to check the shapes and proportions.

Onto the head: before I could build up the face in soft sculpture, I need to put her eyes in. They're 10mm white balls which were drilled through the centre with the smallest drill bit I have (less than 1mm thick). I then used a dremel to make oval concaves for the iris', and painted into these. The final process was to fill the concaves with a blob of clear epoxy resin glue, which is what gives them that bulging 3D look.


Once the glue had set, I drilled new holes into the pupils - these will be used to move the eyes in the sockets during animation.


I had previously covered the skull in a layer of thin wadding, glued down with UHU glue, to give it a sewable base.


 The next stage was to insert the wire elements that would make up the features for soft sculpture. I used copper wire for the non-poseable elements, the ears and the nose. The aluminium wire for the eyelids, eyebrows and lips is very flexible so they can be animated.

I had to carefully drill tiny holes to insert the shaped pieces of wire, and glued them in with a 2 part epoxy.


The next stage was to apply a base layer of nylon to the wire elements. This is particularly important for the eyelids, as it creates the skin for them. This is stitched down to the batting in preparation for soft sculpture.


Once the base layer of nylon was down, I started building up the batting on the face. At this point it looked pretty weird!


As with the body, it was a case of pin and stitch until the shape looks right. I don't know if I ever went into much depth about the design of the skull, but it was cut back from my original sculpture of Nausicaa's 'finished face' by 3mm - the result being a simplified but accurate skull that I could soft sculpt on top of.


Given the scale it was very fiddly work - I used a fine curved needle to stitch on the tiny pieces


At this point she was finally starting to look like Nausicaa! The long pointy chin, large forehead and tiny nose are what make her face.


Comparing her face to my original sculpture was incredibly helpful - this is what she should look like when the nylon covering smooths out the seam lines.

So the next step on Nausicaa will be her skin covering, but right now I'm working on giving Kai some feathers and writing my dissertation. Next week I'll be back with a new post, discussing the creation of Kai's beak, which involved quite a lot of different processes.

Thanks again for following this project, it means a lot to me to know that you're interested in these puppets and the processes involved in making them!

Sunday, 10 January 2016

The Nausicaa Project: The Beginnings of Soft Sculpture

Hello everyone!

I'm back this Sunday to talk about my experiments in soft sculpture, the method which I'm using to build up the bodies of Kai and Nausicaa. My inspiration for this came from the amazing artist Lisa Lichtenfels, who I talked about in an earlier post. You can read about that here.

The basic idea is building up layer after layer of a very fine wadding to create a 3D shape. The sections of wadding are based on the muscles of the puppets. These are pinned to the armature's sewable yarn base and an initial layer is sewn on. It's a process that takes a very long time, and requires a lot of patience, but I've been making strides with it!

In this post I'm going to focus on my progress with Nausicaa. Next week we'll take a look at Kai.


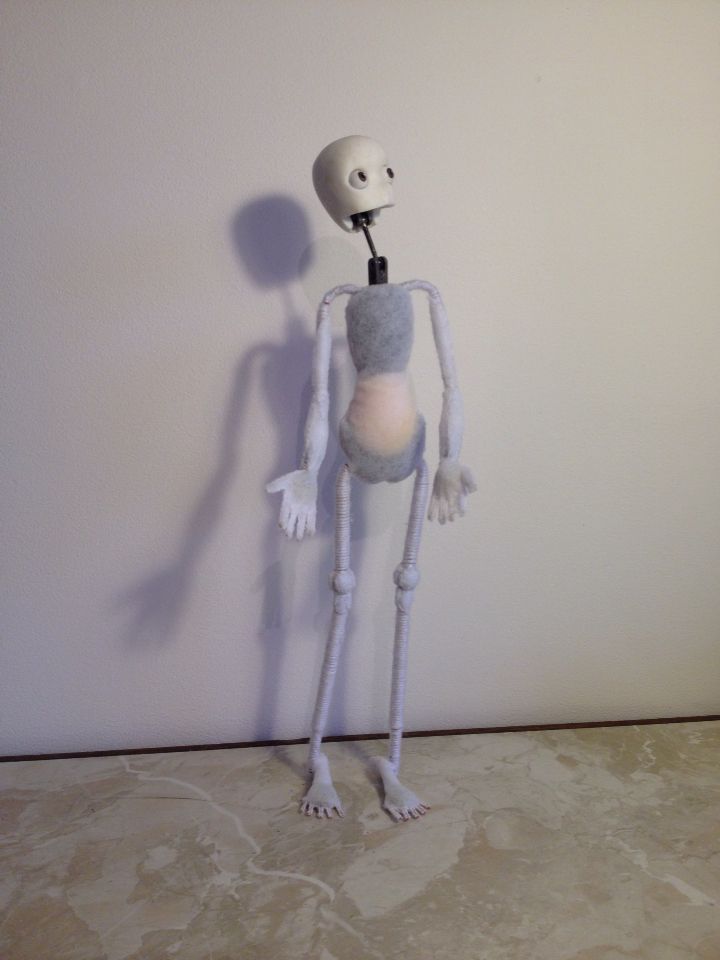
First of all I wrapped her armature tightly in a white yarn. The fingers and toes were wrapped in white thread too. This creates a sewable base for the wadding to be built up onto.


Next I cut some upholstery foam to shape in the gap between Nausicaa's ribcage and pelvis. This is the best material for creating a nice flexible stomach when she leans over. I glued this in place with UHU glue.


The wadding I'm using is Thermore ultra thin quilted clothing batting. It's just a couple of mm thick and doesn't pile at all, so is perfect for building up a body of this scale. I started off by just sewing an inital layer over the body core and the feet. In this photo I also gave the hands a base and started to build up the knee bones. The bone shapes are sewn in felt because it's thicker than the wadding and nice and dense. By viewing the armature as the 'skeleton' of the puppet and working from the inside out like this, I should get a better looking muscle build up later.


I had to be extra-careful when sewing around the fingers, which are really teeny tiny!


The cast skull was attached to the armature before I went any further with the build up process. Having her head on would definitely help with keeping things in scale later.


In this photo I'm starting to build up the muscles on Nausicaa's legs. I have two diagrams of reference based on my initial scale drawings, one of the front of her body and one of the back. The red half is a more acurate rendering, the blue side is a simplified version. Using these as a reference I make pattern pieces, cut them out, pin them to the armature and sew them on.


After a whole day of building up the body, very little had changed from face value! It takes a while for recognisable shapes to form, but building up in layers is completely necessary for the structure of the body to be solid. The body looks dishearteningly strange at the beginning of the process for this reason, but you just have to trust that it will evolve!


Using steel wire, I gave her a collarbone and some shoulder blades.


Precise pinning and careful sewing are crucial - the wadding must lie as flat and seamlessly as possible on the puppet.


After just three full days of sewing, Nausicaa is certainly starting to take shape. My week ahead will be entirely dedicated to finishing her body build up, so keep your eyes out on my Instagram account for daily progress photos!

Sunday, 3 January 2016

The Nausicaa Project: From Clay to Latex Legs

Just a quick update this evening, as unfortunately I've been quite bogged down in dissertation work this weekend! In my last entry I talked about the process of making Kai's legs, from realising the design in clay to moulding it in plaster.

When the two part plaster mould was set, cleaned up and ready to use, I poured latex into the hole where the top of the leg begins. I left this for about half an hour before turning the mould upside down and tipping it out again, which was long enough to create a reasonably thick skin. Obviously I wanted the leg to be hollow so it would fit over the armature. I then left the mould for 24 hours to ensure that the latex was 100% set.

Once removed, this was the result!


By the third attempt I had two feet I was happy with.


The next step was the bulk out the leg armatures so that the latex feet would sit over them solidly. This is often achieved with snipped upholstery foam, but as I'm making the flesh of my puppet using the soft sculpture technique, I thought I would try this out on the feet too.


It has worked just as well, and was quite an accurate way of building up the shapes. I haven't included the claws at this stage, as they're going to be added seperately in fast cast later.


I cut the feet in the corners, slipping the toes over the padded out armature like socks. Once re-aligned, I glued the cut edges back together with contact adhesive. The boots Kai wears have straps which fasten around the toes - these should cover the seam lines nicely.

In this photo I was trying to disguise the seamline left by the two part mould by building up more latex. I had already painted a base coat of acrylic onto the foot, but I didn't realise that this would simply crack and peel when positioned. I had to work over the top of it with acrylic mixed with latex paint. This worked nicely and gave a much better finish too!


Here's a photo of the final base colour, after touching in the seamlines on the toes for some hours to get them looking really smooth. As mentioned before, these aren't actually the final toes. These ones are going to be snipped off and replaced with fast cast alternatives. The hard plastic will be a much more suitable material and will provide a nice contrast to the rubbery legs.

That wraps up my latest Sunday update. Thanks again for reading, and do check back next weekend. I'll probably be discussing soft sculpture in more detail, as the body build-up is what I'm primarily working on in the coming week.