Hi there everyone! Time for another update on a rainy Sunday evening in Cardiff. In this post I'm going to talk about the process of making Kai the bird's beak, from sculpting through to mould making, casting and painting.
I had a few references for Kai's beak from the manga of Nausicaa, the film, a Bandai model kit and also Miyazaki's watercolour concept art. Most of them were similar to look at; a large smooth beak with a horned tip and flat nostril on the top. In one watercolour piece the beak was a bit more interesting - the surface had more shape and detail, which I quite liked. So I decided that my main inspiration for the beak would come from this image:
My plan was to sculpt the beak, based on my scale drawing, in two separate halves. However given that I was making it hollow and quite large, I needed something to support the final shape that I could sculpt on top of.
Here was the solution: I made a solid shape of the beak which was the length/width/shape of the hollow inside I wanted. I then covered this in cling film and built on top of it with a thin Milliput base. Milliput is very strong, so once this solidified I was able to dig out the clay, leaving me with a firm but hollow shape to sculpt on top of. Note that I left a reasonable gap around the eye socket.
Here it is after the clay was removed, the perfect shape and size for building onto. Major credz to Nathan Flynn (Sculpt Double) for teaching me this technique!
I then sculpted the beak onto the Milliput base in medium plastilline clay.
I textured the surface slightly using the end of a bristly paint brush, to give the beak a nice surface for getting that weathered, nomadic animal look!
Once I was happy with how the top half of the beak was looking I made a mould box for it out of foam board glued together with hot glue. The pour spout (coming out of the base into the back of the skull) has a piece of brass rod going through it which was glued down to the base of the foam board, keeping the heavy sculpt stable and secure.
Here it is fully boxed up and ready to be poured!
Here's the resulting silicone mould, just after I poured the two part Fast Cast resin in. It's blue and pink because I ran out of silicone halfway through and the catalyst for the new batch was a different colour!
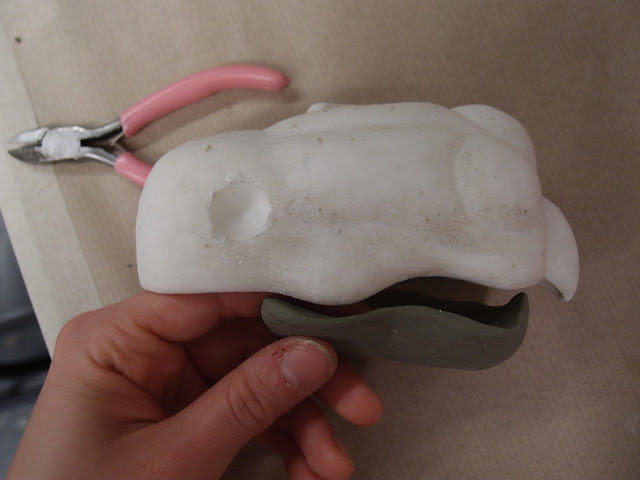
The resulting beak cast! There were a few air bubbles and such that I needed to clean up, but nothing major.
The next stage was to sculpt the bottom half of the beak, which was very tricky because I had to make it fit nicely with the top half and also stay true to the design in the artwork.
I got there eventually and was happy with the final look. Here it is after also being moulded in silicone and cast in fast cast:
After some filling, sanding and a general clean up, the two pieces were ready to paint.
I spray painted them in a base coat of Tamiya 'Wooden Deck Tan'.
I used a combination of ground down chalk pastels and washes of brown acrylic paint to get the desired look. The head is attached to the neck through the skull, the aluminium wire glued to a piece of hollow brass rod I set inside the skull. The bottom half of the beak is attached to the top half in a similar way.
Skipping ahead to where I'm currently at with this puppet, the beak has really come into its own! I'm very happy with how it's looking. Thanks again for following this project, and check back next week for another update.


No comments:
Post a Comment