Monday, 29 February 2016

The Nausicaa Project: Experiments in Nylon

This week's blog post is about how I gave my Nausicaa puppet a covering of nylon skin, and my general experience with using the medium for the first time.

As you'll know from a previous post, the method I've been experimenting with for this puppet is 'soft sculpture'; building up layers of stitched wadding to create a 3D shape with the intention of covering it in a stretch nylon to emulate human flesh. My inspiration comes from the artist Lisa Lichtenfels, who achieves amazing results with this technique.

Once I was happy with the shape and smoothness of the wadding on the body, the next step was to pin and stretch nylon over it, ready to be sewn. I had previously dyed white nylon tights to two shades, a light pink and a pale skin colour. I used Kemtex Rit Dye in 'Sand Beige' and 'Cerise Red' for this:


The light pink was the first layer to be applied. The idea is that by layering two different colours more depth is created, the overall result being a naturalistic warmth in the skin. Before pinning down the nylon I covered any obvious seam lines with little wisps of stuffing to help smooth out the shape. Ideally you want as few seam lines as possible on the nylon, or at least for the necessary seam lines to be in subtle places. So here, I used the same piece of nylon on the legs and the front of the torso, creating the seam at the side of the body and around the armholes:


Getting a neat seam line is vital to the overall look of the skin being fluid, so clean cutting and neat pinning is an important part of the process. It's also important to pull the nylon taut enough, so the nylon doesn't ripple or distort the shape of the body:


At this stage I started needle sculpting in details, like around the toes. The final layer will hopefully look its best, if time is taken on the first!


Once the pink nylon was fully stretched and stitched down I started to apply the second, flesh coloured layer. In some areas, rather than stitching in the details I applied a tiny covering of glue and gently pressed the shape. I found that this gave a nicer result than needle sculpting in some areas, which I definitely need to practice more! The shoulder blade detail came out quite nicely with this technique:


At this stage I was really starting to appreciate just how well the nylon and wadding creates the looks of flesh, and feeling pretty happy with the results! They're such basic and unlikely materials, I'm still amazed at what can be done with them.


The hands were incredibly fiddly, and took me a whole day to get right! They're not perfect, but I managed to make the stitches pretty subtle.


Regarding how I stitched the skin down, for the first layer I tried just pulling the two raw edges together as gently as possible, but the result was quite a visible line which looked uneven and messy. For the skin toned layer I tried a slip stitch instead, which rendered a much more subtle and neat result.


Her face took days of work and I have a lot to say about it, so I'll save it for next week's post. Nausicaa is now fully covered, and I'm definitely very happy with how she's looking overall. I still have a lot to learn about this soft sculpture technique, and working on this puppet has only made me more curious to experiment more and keep learning.

Thanks for reading, check back next week for my post on covering the face!

Sunday, 21 February 2016

The Nausicaa Project: Blue Plumage

My Post this week is going to be on how I made miniature feathers for Kai. This was my main reference for the overall look and colour:


I considered some different methods of how I might make the feathers - silk fabric, tissue paper - in the end it made the most sense to use actual feathers, as you can't get closer than the real thing! The only issue was scale, as this puppet needed to be covered in 2cm long feathers, with stalks that were very thin. 

I experimented with cutting down the top of a regular sized feather and found that it looked like the perfect miniature:


So now I had to work out how many feathers I'd need to cover Kai, and order a bulk lot of the same type for consistency. I ordered 600 white goose feathers, with the intention of hand dyeing them blue myself. I considered buying them pre-dyed to save time, but for the right colour match and a natural variation I figured that mixing the colour myself was the best option.


I then spent 10 hours dyeing 600 feathers! I discovered two valuable things: one, the waxy surface of feathers don't like to take dye, so you have to give them a really good wash in soda ash first. Two, rit dye doesn't work very well, silk dye works much better. I guess that's because it's made for a natural material. I ended up using a combination of rit dye and silk dye in the vat, in two different shades of blue.


By changing the consistency of how long I dyed different batches of feathers for, and how concentrated the dye was (or varying the colour - I dipped some of them in a separate purple vat) I ended up with feathers in a myriad of blue and purple tones, just what I wanted!

I started by building up the tail, as I'd need larger feathers for this part. My aim was to get the 'fan' look, similar to Miyazaki's artwork:


I started at the base of the tail and built backwards, starting with smaller feathers and working my way out to the very large ones.


The feathers are glued to the nylon skin of the bird puppet with a dab of UHU glue.


I was able to build up a lovely fan shaped tail, similar to the artwork. My only thought is that it could be held higher, so I might revisit that at a later point and see if I can get the larger feathers around the edge to stick up more.


For the main feathers on the body, I'd need hundreds of teeny tiny feathers. I worked out that 2cm was a good looking standard size. One by one, I started cutting the large feathers down, production line style! Unfortunately half of each feather went to waste, because it gets to the point where the stalks are too thick and out of scale.


I started by layering these on the back, once again using a dab of UHU glue on the ends to secure them to the body. At this point I really began to appreciate the effect of the colour variation.


I used the most fluffy, downy feathers for Kai's chest, as they have a lovely fluffiness to them.


The build up process was surprisingly quick! Although repetitive, each new patch of skin covered was very satisfying.


I also used the downy feathers for the bottom of the legs, where they'd likely be smaller and fluffier.


I like how the feathers have an almost armour-like quality to them when they're layered up. The trickiest part was the top of the legs, as I had to get that curve looking natural.


The stalks on the feathers got a little thick here, as I was running low and having to use offcuts. I think they'll look just fine if I paint out the white stalks individually.


From the front, nearly finished and looking noble!


The head was the last section that needed covering, and required the most detail. I made the feathers smaller on the face, especially around the eye. As you can see at this point, he's got a silicone skin piece that sits around the eyeball. I sculpted this, made a plaster mould for it and cast it.


It got to the point where I had to make my own feathers by glueing two sides cut down from a large stalk back together again, because I'd totally ran out of feathers in the right scale. Can you tell the difference between the fake and real feathers in the photo?


Kai isn't 100% covered yet because I ran out of feathers, leaving half of his belly naked. I've ordered some more and will be dyeing them soon to get him finished and ready for prop decorations - his saddle, bridle, saddle bags etc.

Thanks for reading and following my project!

Sunday, 7 February 2016

The Nausicaa Project: A Prehistoric Beak Takes Shape

Hi there everyone! Time for another update on a rainy Sunday evening in Cardiff. In this post I'm going to talk about the process of making Kai the bird's beak, from sculpting through to mould making, casting and painting.

I had a few references for Kai's beak from the manga of Nausicaa, the film, a Bandai model kit and also Miyazaki's watercolour concept art. Most of them were similar to look at; a large smooth beak with a horned tip and flat nostril on the top. In one watercolour piece the beak was a bit more interesting - the surface had more shape and detail, which I quite liked. So I decided that my main inspiration for the beak would come from this image:


My plan was to sculpt the beak, based on my scale drawing, in two separate halves. However given that I was making it hollow and quite large, I needed something to support the final shape that I could sculpt on top of.


Here was the solution: I made a solid shape of the beak which was the length/width/shape of the hollow inside I wanted. I then covered this in cling film and built on top of it with a thin Milliput base. Milliput is very strong, so once this solidified I was able to dig out the clay, leaving me with a firm but hollow shape to sculpt on top of. Note that I left a reasonable gap around the eye socket. 


Here it is after the clay was removed, the perfect shape and size for building onto. Major credz to Nathan Flynn (Sculpt Double) for teaching me this technique!


I then sculpted the beak onto the Milliput base in medium plastilline clay.


I textured the surface slightly using the end of a bristly paint brush, to give the beak a nice surface for getting that weathered, nomadic animal look!


Once I was happy with how the top half of the beak was looking I made a mould box for it out of foam board glued together with hot glue. The pour spout (coming out of the base into the back of the skull) has a piece of brass rod going through it which was glued down to the base of the foam board, keeping the heavy sculpt stable and secure.


Here it is fully boxed up and ready to be poured!


Here's the resulting silicone mould, just after I poured the two part Fast Cast resin in. It's blue and pink because I ran out of silicone halfway through and the catalyst for the new batch was a different colour! 


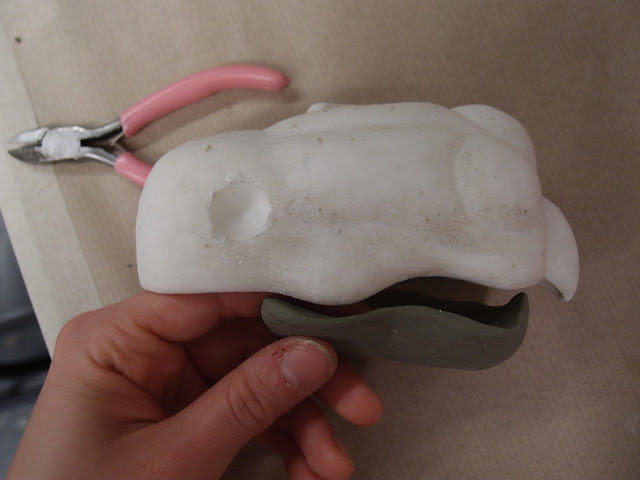
The resulting beak cast! There were a few air bubbles and such that I needed to clean up, but nothing major.


The next stage was to sculpt the bottom half of the beak, which was very tricky because I had to make it fit nicely with the top half and also stay true to the design in the artwork.


I got there eventually and was happy with the final look. Here it is after also being moulded in silicone and cast in fast cast:


After some filling, sanding and a general clean up, the two pieces were ready to paint.


I spray painted them in a base coat of Tamiya 'Wooden Deck Tan'.


I used a combination of ground down chalk pastels and washes of brown acrylic paint to get the desired look. The head is attached to the neck through the skull, the aluminium wire glued to a piece of hollow brass rod I set inside the skull. The bottom half of the beak is attached to the top half in a similar way.


Skipping ahead to where I'm currently at with this puppet, the beak has really come into its own! I'm very happy with how it's looking. Thanks again for following this project, and check back next week for another update.